Recipe Index

Double Chocolate Cookies & Cream Dough Eggs

Cookies & Cream Chelsea Bun Recipe

Cookies & Cream Millionaire's Shortbread

Cookies & Cream Easter Cake

Cookies & Cream Ombre Cheesecake
Double Chocolate Cookies & Cream Dough Eggs

|
Time |
 |
Difficuty |
 |
Serves |
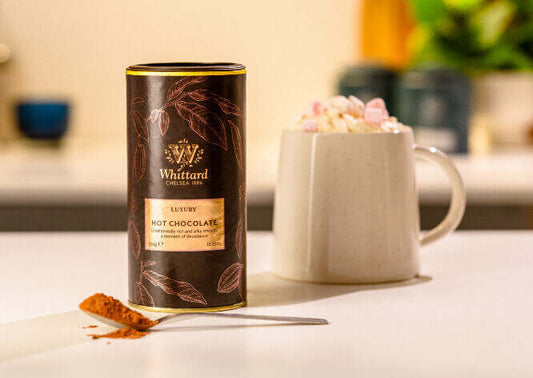
Nourishing Amy has created the ultimate vegan no-bake sweet treat you can make at home. They include a thick chocolate shell filled with our Cookies and Cream Hot Chocolate flavoured cookie dough and a hidden layer of gooey caramel.
INGREDIENTS
For the Cookie Dough:
- 120g runny, smooth nut butter
- 4 tbsp (60ml) maple syrup
- 1 tsp vanilla essence
- 100g dark chocolate
- 100g oat flour
- 60g ground almonds
- 2 tbsp of Cookies & Cream Hot Chocolate
- A pinch of salt
- 40g chocolate chips
For the Chocolate Shells:
- 6 tsp caramel sauce or extra nut butter
- 250g dark chocolate, divided
- 40g white chocolate
- 1 tbsp sprinkles
METHOD
- Chill your silicone egg moulds in the fridge (you will need 12 egg moulds). [If you don't have a mould, you can use cupcake cases and repeat the same method as above, shaping the cookie dough into rounds. Or use without a case by shaping the dough into eggs, placing in the fridge for 20 minutes and then coating in chocolate as they are.]
- Stir together the nut butter, maple syrup and vanilla till smooth. Add in the oat flour, ground almonds, Whittard Cookies and Cream Hot Chocolate and salt. Stir into a chunky dough. Fold in the chocolate chips.
- Divide the mix into 12 egg shapes, just smaller than your egg moulds, if using a silicone mould. You may have some mix left, roll these into balls and enjoy them as they are!
- Melt 200g of the chocolate, use half to coat all the moulds once. Place on a board and into the fridge for 15 minutes to set. Now use the remaining melted chocolate to coat the shells a second time and chill again (this means they are stronger).
- When the chocolate is set, melt the remaining 50g chocolate. Place one cookie dough egg into each shell and press down firmly to fill the egg. Top each with ½ tsp caramel and then cover with the melted chocolate, making sure to seal in all the edges.
- Place back in the fridge for 30 minutes, or until set.
- Carefully remove from the fridge and from the silicone moulds. Melt the white chocolate and drizzle this over the eggs. Add on the sprinkles and enjoy. Keep the eggs in a sealed container for 3 to 5 days or in the fridge for 1 week.
Cookies & Cream Chelsea Buns

|
Prep Time |
|
Difficuty |
|
Serves |
You're going to love this American twist on a classic British recipe. This Chelsea Bun recipe by Beabop Bakes includes our Cookies and Cream Hot Chocolate powder, giving each one a rich chocolaty centre.
INGREDIENTS
For the Dough:
- 500g strong white flour
- 25g caster sugar
- 1 tsp salt
- 7g fast-action dried yeast
- 250ml whole milk
- 2 large eggs
- 100g unsalted butter (softened)
Cream cheese filling:
- 80g dark chocolate (preferably 70%)
- 70g unsalted butter
- 65g icing sugar
- 18g Cookies & Cream Hot Chocolate
- Pinch of salt
- 30g unsalted butter (softened)
- 150g cream cheese (room temperature)
Cream Glaze:
- 30g unsalted butter
- 3 tbsp lemon juice
- 1 tsp vanilla bean paste
- 200g icing sugar
- Pinch of salt
METHOD
- For the dough, combine and briefly whisk the flour, sugar, salt, and yeast in the bowl of a stand mixer fitted with the dough hook. Then add the eggs and milk and mix to form a shaggy dough, once this has formed, continue to mix for another 10 minutes on a medium speed until smooth and elastic.
- Turn the mixer down to a low speed and gradually add in the butter, mixing well between each addition. Once all the butter has been added, mix until the dough is pulling away from the sides of the bowl.
- Place the dough into a large, lightly greased bowl and cover with clingfilm - leave to rest in the fridge for at least 12 hours and up to 48.
- For the Cookies & Cream filling, melt the 70g butter over medium heat, once melted add in the dark chocolate and stir until combined and melted. Then mix in the hot chocolate powder, icing sugar and salt until fully incorporated. Place in the fridge and stir every 10 minutes until it forms a spreadable paste.
- For the cream cheese filling, beat together the 30g of softened butter with the cream cheese until fully combined.
- Roll out the dough onto a lightly floured work surface into a large rectangle, approximately 40x55cm. Spread on the cream cheese filling and then the Cookies & Cream filling. Starting from a long edge, tightly roll up the dough and then cut into 12 equal pieces using a piece of string. Place each roll into a 9x13” baking tin lined with greaseproof paper, cover with clingfilm and leave to prove in a warm place for 1 hour until the buns are touching each other.
- Preheat the oven to 190 degrees C. Bake the buns for 30 minutes, until puffed and golden.
- For the glaze, mix the butter, lemon juice, salt and vanilla in a small pan over medium heat. Once the mixture begins to bubble, take it off the heat and gradually add in the icing sugar until you get the desired consistency. Drizzle over the warm buns and sprinkle crushed chocolate biscuits or Cookies & Cream hot chocolate powder over the top. Enjoy!
Cookies & Cream Millionaire's Shortbread

|
Prep Time |
|
Difficuty |
|
Serves |
Buttery, caramelly, and golden. Just three words to describe this incredible Cookies & Cream Millionaire's Shortbread recipe oozing with flavour. Follow our easy recipe, created by Jessie Bakes Cakes, to bake these bitesize pieces of heaven.
INGREDIENTS
For the shortbread base:
- 230g Plain flour
- 200g Unsalted butter, soft
- 50g White Caster Sugar
- 70g Cookies & Cream Hot Chocolate
For the caramel layer:
- 150g Unsalted butter
- 300g White caster sugar
- 60g Golden syrup
- 1 tin (397g) Condensed milk
- ¼ tsp Salt
Chocolate Topping:
- 300g Milk chocolate
- 50g White chocolate
- Edible gold spray
METHOD
For the shortbread base:
- Preheat your oven to 180°C (fan).
- Line an 8inch/20cm square baking tin with greaseproof paper.
- Cream the butter and sugar together until light and fluffy.
- Sift the Cookies & Cream Hot chocolate powder and flour into the bowl.
- Use your hands to bring the mixture together into a dough.
- Press the dough out into the base of the tin, and prick all over with a fork.
- Bake for 20 minutes. Set aside and leave to cool whilst you make the caramel.
For the caramel layer:
- Measure all the ingredients into a medium-large saucepan.
- Place the saucepan over a medium-low heat and stir with a wooden spoon or spatula until the ingredients have melted into a smooth mixture.
- Turn the heat up to medium so that the mixture starts to bubble up. Once bubbling set your timer for 5 minutes and keep stirring continuously until the caramel thickens and turns golden in colour.
- Take the saucepan off the heat and stir the caramel for 30 seconds to knock out the air pockets. The caramel will darken in colour as it cools down.
- Pour the caramel over the shortbread and spread out into an even layer.
- Leave to cool at room temperature for 30 minutes. Then place in the fridge for 1 hour to set.
For the chocolate topping:
- Break up both chocolates into separate bowls and microwave in 30-second blasts, stirring between each, until smooth.
- Take the baking tin out of the fridge and pour the milk chocolate on top of the caramel, spreading it out to the edges.
- Drizzle the white chocolate on top, then use a skewer or toothpick swirl the chocolates together.
- Put back in the fridge to set (roughly 1-2 hours).
TIME TO SLICE!
- Remove the tin from the fridge and lift out the millionaire's shortbread. Leave at room temperature for 30 minutes to soften the layers.
- Run a large sharp knife under hot water for 30 seconds and dry with a towel (this will help slice through the layers).
- Score the chocolate topping to make a groove, then cut into 12 and serve.
Shop the Recipe COOKIES & CREAM |
Where to Next? SHOP HOT CHOCOLATE |
Chocolate Easter Cake

|
Prep Time |
|
Difficuty |
|
Serves |
It feels right to only bake an indulgent, chocolatey cake at Easter. And My Kitchen Draw's showstopping recipe includes just that! It's light, fluffy, and has all the creamy goodness you could ever want, perfectly mixed with a black chocolate crunch.
INGREDIENTS
For the sponge:- 350g plain flour
- 2 tsp baking powder
- 1 tsp salt
- 50g of Cookies & Cream Hot Chocolate
- 4 eggs, large
- 400g light brown sugar
- 2 tsp vanilla extract
- 240ml vegetable oil
- 300ml buttermilk
- 300g butter, unsalted
- 550g icing sugar
- 1tsp of Cookies & Cream Hot Chocolate
- ½ tbsp cocoa powder
- ½ tsp vanilla
- 1-2 tbsp water
- Chocolate eggs for decoration
METHOD
For the cookies & cream chocolate sponge:- Preheat the oven to 170°C, and line three 6” cake tins with non-stick baking paper.
- In a medium bowl, add the flour, baking powder, salt and Cookies and Cream hot chocolate, then whisk together to combine.
- In a separate bowl or stand mixer add the eggs, sugar and vanilla and beat on high for around 5 minutes until the mixture looks thick with a mousse consistency.
- Slowly drizzle in the oil then continue whisking the mixture for another minute.
- Add 1/3 of the flour mixture and a 1/3 of the buttermilk and mix until just combined then repeat with the other two thirds and mix until the batter is smooth.
- Split the mixture between the prepared cake tins and then bake for 40-45 minutes or until a skewer comes out clean.
- Once baked leave the cakes to cool completely on a wire rack.
- In a large bowl or standing mixer, mix the butter for 2 minutes to loosen up then add the icing sugar a tablespoon at a time to avoid a huge sugar cloud.
- After all the sugar has been added, mix in the vanilla, and hot chocolate powder and beat to combine for 3 minutes until it's light, creamy and easily pliable. Add a splash of milk if the buttercream to loosen the buttercream if it still feels a little stiff.
- If your cake layers have domed tops, level them off with a knife so you have flat cake layers (and some scraps for tasting)
- Place one cake layer onto your cake board and spread around 3 tbsp of buttercream across the top.
- Add the second layer on top and repeat with more buttercream.
Vegan Ombre Chocolate Cheesecake

|
Prep Time |
|
Difficuty |
|
Serves |
Treat loved ones to a vegan dessert that tastes as good as it looks! The Little Blog Of Vegan has developed a recipe for a cheesecake that is packed full of flavour, using our Cookies and Cream Hot Chocolate.
INGREDIENTS
For the base:- 2 tablespoons of ground flaxseed + 4 tablespoons of water
- 70g of dairy-free butter / margarine
- 125g of caster sugar
- 4 tablespoons of Cookies & Cream Hot Chocolate
- 120g of plain flour
- 1/2 teaspoon of baking powder
- 180g of dairy-free dark chocolate
- 2 tablespoons of Cookies & Cream Hot Chocolate
- 350g of cashew nuts*
- 600g of dairy-free cream cheese
- 200g of coconut cream*
- 160g of icing sugar
- Dairy-free whipping cream
- Cookies and cream cookies (decoration)
METHOD
For the base:- Preheat oven to 180 degrees c fan, and line an 8-inch loose base / push up cake tin with grease-proof paper.
- Make the flax eggs - Add the flaxseed into a small bowl and add the water. Stir to combine then set aside to thicken. This will take around 10 minutes.
- In a large mixing bowl, add in the dairy-free butter/margarine, sugar and flax eggs. Whisk to combine until light in colour.
- Add in the Whittard Cookies and Cream Chocolate Hot Chocolate powder, baking powder and flour. Mix until a thick brownie batter. Press the batter into the loose base / lined cake tin, making sure to get it as flat as possible.
- Smooth out using the back of a spoon or off-set spatula. Alternatively, use your hands. Tip: As the brownie batter is sticky, dip your finger tips in cocoa powder before pressing it down. This prevents any sticking.
- Place the tin into the middle of the oven and bake for 20-25 minutes. You will know the brownie has baked when you put a knife or skewer down the centre and it comes out clean. Allow the brownie to cool fully in the tin before adding on the cheesecake.
- Place the chocolate into a heat proof bowl. Fill a small saucepan 1/4 with water and place over the hob on a low / medium heat. Place the bowl on-top to create a bain-marie. Melt the chocolate.
- Drain the cashew nuts from the water and place them into a food processor/blender along with the dairy-free cream cheese, icing sugar and coconut cream. Whizz up on high speed for around 5 minutes until smooth. Add some more coconut cream if needed. It's best to use a high-speed blender if possible as the mixture is quite thick, and you want it as smooth as possible.
- Put in equal amounts of the cheesecake mixture in three separate bowls. Add half of the melted chocolate into the first bowl and mix to combine.
- Add half of the remaining chocolate to the second bowl and add the leftover chocolate into the third bowl. Whisk to combine. You should have 3 bowls of chocolate going from dark to light in colour. This creates the ombre effect.
- Pour the darkest cheesecake filling over the base and level out with an offset spatula or spoon.
- Place the cheesecake in the freezer to set until slightly set. This will take around an hour. Once the first layer is firm, pour over the second darkest shade and repeat. Repeat until all three cheesecake flavours are in the tin.
TIP: SPRINKLE WHITTARD COOKIES AND CREAM HOT CHOCOLATE POWDER IN-BETWEEN EACH CHEESECAKE LAYER. - You can place it into the freezer for 4-6 hours/overnight to set. Once set, store in the fridge, and allow it to come to room temperate before serving.
- To serve whip up some dairy-free whipping cream, add it into a piping bag fitted with a star tip nozzle and pipe a swirl around the top edge of the cheesecake, finishing it off with cookies and cream cookies and a dusting of Whittard Cookies and Cream powder.
Shop the RecipeCOOKIES & CREAM |
Where to Next?SHOP HOT CHOCOLATE |